|
|
|
|
|
|
|
|
|
|
Version 6 |
|
FREE AutoCAD utilities, by Alex Borodulin
![]() Play
Videos:
Play
Videos:
| MidwayPoint_Text.exe | Traces.exe |
| Leaders.exe | ViewSave_Restore.exe |
| Move_Copy_Break.exe | RemoveLayFilters.exe |
| FastCircles_Fillet.exe | Mirror_StatusLine.exe |
| Add Holes | OSNAP.exe |
Nyacad FREE is a set of AutoCAD utilities. The current release contains 32 AutoLISP and VBA routines I’m using frequently in my work. System requirements: AutoCAD 2000 or higher.
After auto installation is complete you will find the new folder on your workstation:
C:\NYacadFREE
Start AutoCAD and configure your support path information to include the directory C:\NYacadFREE.
To do this type at the command prompt: preferences. Then in “Options” dialog window press tab “Files”,
select “Support File Search Path”, press button “Add…”, then “Browse…” and select folder C:\NYacadFREE
Next include files NYacadFREE.lsp and NYacadFREE.dvb (found under C:\NYacadFREE directory) in ACAD Startup Suite. To do it:
· Type "appload" at the command prompt
· Press button “Contents…”
· Click on “Add…” button and browse to find files.
The last step - add menu (tool bar only):
· Type "menuload" at the command prompt
· In “Menu groups” tab press the button “Browse…” and locate the file C:\NYacadFREE.mns. After that click on “Load” button

· Close dialog window.
The new toolbar appears on the screen.

When you draw any ACAD object (line, dimension, leader, circle etc.) or perform modifying command (move, copy etc.), you can click on the first button
![]()
on the toolbar to find point in the middle of two points, picked on the screen. Any combination of snap points is acceptable (Endpoint + Center; Midpoint + Perpendicular etc.). This OSNAP option is a standard only in AutoCAD2005 (Shift + Shortcut menu, which is not convenient).
Remark: Some times this command does not produce desirable result. Try to zoom in to be closer to area where you need to define the midway point.
Safe Plot. Two bad things will not happen with this command anymore. The First: If you forgot to change LTScale to 1 before sending PSpace layouts to plot, you will get the wrong appearance of hidden or centerlines. For fear of First bad thing you are keeping LTscale =1 even in ModelSpace (everything looks like continuous). The PF command makes LTscale = 1 (if you are in PaperSpace), sets up PSLTSCALE to 1 and then performs 'Plot' command. Now when you are in ModelSpace, feel comfortable to set up any value of LTScale variable. You also can call out this command by pressing the button in toolbar (the third button slightly reminding printer).
Use this button if you have a problem with right button of mouse, when you cannot use right click button + Shift to call out Osnap popup menu.
Annoying problem can be caused by some add-ons for AutoCAD. Some of the routines written in AutoLISP or VBA are using at the start turning off osnap (OSMODE variable 0). Due to wrong routine performance or for other reasons the original osnap setting (before starting the routine) might not be restored after the command is complete. And you have to restore your preferable osnap setting starting from scratch: open 'Object Snap' dialog window (command osnap) and check object snap modes of your choice (intersection, nearest, center etc.). This operation can be repeated 20 or even more times per a day. It takes time, really. To make osnap restoring faster, use this button. First establish your preferences: check options in 'Object Snap' dialog window. Next enter OSMODE at the command prompt - get the number (e.g. 695). NYacadFREE is using 695 as preferable OSNAP mode setting. If you have different preferences (different number), then:
Close AutoCAD
Open AutoLISP file NYacadFREE.lsp (found under C:\NYacadFREE folder)
Find text shown below (in the beginning of the file)

and change 695 to the number you wish to use
Save and close AutoLISP file.
Start AutoCAD
You also can restore OSNAP setting from command prompt. Back apostrophe ` (the very first button next to 1 on keyboard) is used for launching of this command.
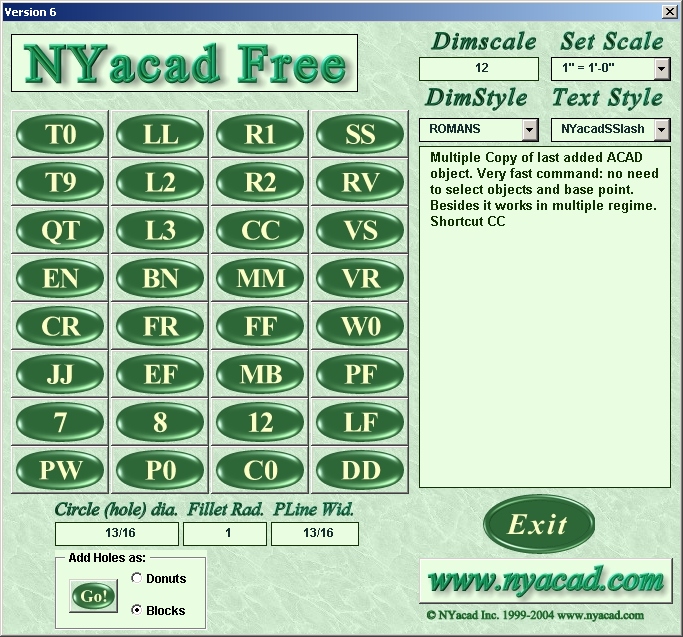
Click on the green button (see the toolbar picture above) or type MF (or M,) to load Main Form:
Type T0 at the command prompt and press ‘Enter’. The Height of Text will be assigned automatically (based on Dimscale and Active Space). Prompt for text rotation is eliminated. No GIGANTIC sizes of text in PaperSpace anymore!
Remark: The current text style height should be zero.
Type T9 at the command prompt and press ‘Enter’.
Type QT at the command prompt and press ‘Enter’. Again the Height of the Text will be assigned automatically, the prompt is faster. New Mtext will have zero width (advantage: Mtext can be traced on the screen, when you move or copy it).
Type EN at the command prompt and press ‘Enter’ to perform Lengthen command with commonly used DElta option. Specify the distance and select objects. The standard performance of Lengthen command has one disadvantage: too many steps in input.
Type LL at the command prompt and press ‘Enter’ to add leader with attached text:

What the command will do:
Import dimstyle ‘Leader’ from the template. You can set the preferences of style ‘Leader’ before: open template C:\NYacadFREE\NYacadFREE.dwg and make appropriate changes. Save template and close.
Set current dimstyle to ‘Leader’.
Update dimstyle with regard to the value of Dimscale and Active Space (Model or Paper)
After you added the leader (the number of prompts is less then in standard AutoCAD qleader command) the current dimstyle will be restored.
Very Quick Leaders are very flexible for modifications due to attachment of the text is to the middle of multi-line text (no problem with mirroring).
Type L2 at the command prompt and press ‘Enter’ to add straight leader without attached text (for instance to weld symbol).

Type L3 at the command prompt and press ‘Enter’ to add leader (3 points) without attached text.

Type BN at the command prompt and press ‘Enter’.

This command will break the line (polyline or arc) at intersection point using (Multiple regime). Press Escape on keyboard to finish the command).
Type R1 at the command prompt and press ‘Enter’ to add Trace (solid line). I did not find this object in AutoCAD menu, but the command exists. Traces look like polylines with specified width, but they have edges.
Type R2 at the command prompt and press ‘Enter’ to add Trace as a solid rectangle. Good to show holes in elevation view or for solid hatching of not closed areas: you do not need to add lines to create closed boundary and then add solid hatch.
Type CC at the command prompt and press ‘Enter’ to perform Multiple Copy of LAST added ACAD object. Very fast command: selecting of objects and picking base point are eliminated.
Type MM at the command prompt and press ‘Enter’. This command can replace the using of Temporary Tracking point, because very often MM is faster.
Save drawing and close it in one step without a mouse. Just type SS and press Enter.
Set your preferences for important ACAD variables by entering RV at the command prompt. The list of variables (red text) and their values (blue text) covered by program:
(setvar "MIRRTEXT" 0)
(setvar "VISRETAIN" 1)
(setvar "ATTDIA" 1)
(setvar "FILEDIA" 1)
(setvar "CMDDIA" 1)
(setvar "PSLTSCALE" 1)
(setvar "TEXTFILL" 1)
You can add yours:
Close file and start AutoCAD.
Save View (from command prompt -it is faster then with using dialog window). Current view will be saved (the name of view: 1). Shortcut VS
Restore View 1 (without calling out dialog window). Shortcut VR
Isn't it better to define circle by its Diameter, have frequently used size as default and multiple regime? Set your preferred DIAMETER value (any format) in form. This value will be used when you call out this command with shortcut CR next time. After that multiple copy will be applied (often it is faster than using Array). Shortcut CR
Set your preferred Fillet Radius value (any format), which will be used when you call out this command with shortcut FR next time. Multiple regime is used for this command.
Fillet command (radius = 0). Multiple regime. Shortcut FF
Change selected MText objects WIDTH to zero. Shortcut W0
Join polylines
(Fuzz distance = 0)
Compare with standard input:
Command PEDIT > Multiple > Select objects > Answer Yes (ACAD prior 2004) > Join > Confirm Zero fuzz distance > Two times press Enter...
Shortcut JJ
Change the layer of selected objects to Defpoints. The advantages of this command become clear when you need to apply Zoom (Pan) command to select objects and when you have several layers with the first character 'D'.
Shortcut EF
Common Break command in Multiple regime.
Shortcut MB
Safe Plot. Two bad things will not happen with this command anymore. The First: If you forgot to change LTScale to 1 before sending PSpace layouts to plot, you will get the wrong appearance of hidden or centerlines. For fear of First bad thing you are keeping LTscale =1 even in ModelSpace (everything looks like continuous). The PF command makes LTscale = 1 (if you are in PaperSpace), sets up PSLTSCALE to 1 and then performs 'Plot' command. Now when you are in ModelSpace, feel comfortable to set up any value of LTScale variable. You also can call out this command by pressing the button in toolbar (the third button slightly reminding printer).
Before you start the mirror command you already know, what to do with selected objects: remove them or not. You don't need the prompt about deleting source objects (eliminated with this command). The command 7 (as well as its twin 8) is my favorite: it has been working for me since early 90th. Shortcut 7
Shortcut 8
At the beginning of AutoCAD session you click on button ‘12’ in main form or enter 12 at the command prompt. Look at the lower left corner of ACAD window: the status line displays the value of dimscale (auto updated). Remember: you need to activate status line only when you start AutoCAD or during AutoCAD session. Shortcut 12
Removing Layer Filters is a tedious task, because you cannot use multiselect or select all filters you would like to get rid of. Press the button ‘LF’ (or enter command ‘LF’) to open the form where you can select Layer filters to be deleted.

All selection methods are acceptable: double click; hold left mouse button and drag mouse; with/without Ctrl or Shift. Shortcut LF
Add polyline. Width = value in 'Pline Witdth' box in Main form (saved as default). Shortcut PW
Add polyline. Width = 0. Shortcut P0
Frequently when you apply Copy with Base point command you are using 0,0 as a base point. With this command (shortcut C0) you do not need to enter 0,0.
Dimlinear command performed in multiple regime. Shortcut DD.
For adding filled holes you can use this command (shortcut IH). If you prefer donuts, click on ‘Donuts’ option button. If you prefer blocks, click on ‘Blocks’ button. Diameter of hole specified in ‘Circle (hole) dia.’ box in main form (used as default when next time you will start adding holes). You can setup the color of block. Open file Hole-Block.dwg in NYacadFREE folder and change the color of layer _HOLES. DO NOT change the name of that layer. Save and close Hole-Block.dwg
=====================================================================
If you have any questions or comments, please feel free to contact me via email alex@nyacad.com

